You turn on the hose. The soil looks bone dry. The plants are thirsty.
And then something strange happens.
Instead of soaking in, the water beads on the surface. Or it pools. Or it races across the bed and disappears over the edge. Sometimes the top inch looks thoroughly wet, but scratch beneath it and the soil underneath is still dusty and dry.
Most gardeners respond the same way: they water longer.
But that may not solve anything. Because when soil won’t absorb water properly, the problem is usually not how much water you’re applying. The problem is what happens between the moment the water hits the ground and the moment it reaches the roots.
And your garden is trying to tell you something.
First, a Little Soil Language: What Is Infiltration?
Infiltration is simply the movement of water from the soil surface into the soil.
Healthy soil doesn’t necessarily absorb water instantly, and different soils absorb at very different rates. Sandy soils have larger pore spaces; fine-textured and compacted soils move water much more slowly. A restrictive layer below the surface can slow things down too.
So the useful question isn’t how fast does my soil absorb water? It’s why is my soil behaving the way it is? Water that beads on top is telling you something very different from water that puddles—and water that vanishes instantly may not be a good sign either.
Watch the Water Before You Fix the Soil
Before you add compost, gypsum, sand, wetting agents, or anything else, water a small area and simply watch. Here’s what different patterns may be telling you:
| What the water does | What to investigate |
|---|---|
| Beads up like water on a waxed car | Water-repellent or hydrophobic soil |
| Runs across the surface | Compaction, slope, crusting, or too high an application rate |
| Sits in a puddle | Slow infiltration, heavy soil, compaction, or a restrictive layer |
| Wets the top but not the soil below | Surface wetting without deep infiltration |
| Disappears fast, or soaks in only at cracks | Sandy soil, or bypass flow through cracks and channels |
| Runs down the inside edge of a container | Severely dry or shrunken potting mix |
That distinction matters. A garden bed can receive plenty of water and still leave the roots dry.
So What’s wrong with my soil? How to fix your soil.
1. The Soil Has Become Hydrophobic
This is one of the strangest things a gardener can see. You pour water onto dry soil and, instead of spreading and soaking in, it forms little beads. The soil appears to be rejecting it.
This is hydrophobic, or water-repellent, soil. It doesn’t mean your soil is afraid of water—it means the surface is resisting wetting, holding droplets instead of pulling them into the pore spaces.
It becomes especially noticeable after prolonged drying, and it’s familiar to anyone who’s let a peat-heavy potting mix dry out completely. University of Maryland Extension notes that soilless container mixes can turn hydrophobic and may need to be physically rewetted before they’ll accept water normally again.
What it looks like
- Water beads on the surface
- Dry patches remain after irrigation
- Some areas absorb while others repel
- Soil beneath mulch stays unexpectedly dry
- Containers feel light even after “watering”
What to do: rewet gradually
The goal isn’t to overwhelm the soil—it’s to gradually reestablish contact between water and the dry medium. This slow-rewetting method is the fix for any dried-out, water-repellent soil or container mix, so it’s worth learning once:
- Apply a small amount of water.
- Wait several minutes.
- Apply more.
- Repeat until the root zone is evenly moist.
For a badly dried container, gradual bottom watering can help rewet the root ball—just let it drain fully afterward. In severe cases, a product specifically labeled as a soil wetting agent may help; these work by changing how water interacts with a hard-to-wet surface.
One thing I would not do
Do not assume dish soap, shampoo, or household detergent is the same as a horticultural wetting agent. That internet “hack” gets repeated constantly, but cleaning products aren’t formulated or labeled for the root zone. University of Illinois Extension specifically advises against the shampoo workaround, and University of Georgia Extension notes household dishwashing products aren’t labeled for plant use.
Use products for their intended purpose. Your soil is not a dirty dinner plate.
Did You Know? A dry soil can repel the very water it desperately needs. As peat and other organic materials dry past a certain point, their surfaces turn water-shedding—so the thirstier that soil gets, the harder it becomes to rewet. It’s the reason a light “quick drink” often runs straight off and does almost nothing, while slow, patient rewetting works.
2. Your Soil Is Compacted
If water hits the ground and moves sideways instead of down, compaction should be high on your list. Compaction reduces pore space—and those pores are the pathways water and air move through. The result is poorer infiltration, more runoff, ponding, erosion, and restricted roots. Both USDA soil guidance and university extension resources flag reduced infiltration as a major consequence of compaction.
Common causes
- Walking repeatedly through beds
- Wheelbarrow or equipment traffic
- Working soil when it’s wet
- Repeated tillage at the same depth
- Bare soil pounded by heavy rain
- Years of gardening without maintaining structure
A simple clue
Push a long screwdriver or soil probe into the ground after watering—not as a lab test, just as a comparison. Try the problem area, a nearby path, a healthy bed, and a mulched spot. If the probe suddenly gets hard to push at the same depth across the bed, you may be hitting a dense layer.
What to do
The goal isn’t to fluff the soil for a day; it’s to rebuild structure that keeps pathways open for roots, organisms, air, and water. Depending on the site, that means keeping foot traffic out of permanent beds, using defined paths, protecting the surface, growing living roots and cover crops, adding organic matter where appropriate, and avoiding unnecessary disturbance. USDA guidance is blunt on the payoff: healthy, functioning soils absorb and hold more water and shrug off runoff and erosion.
3. The Surface Has Formed a Crust
Sometimes the whole profile is fine—the problem is the first 1/2 inch – few millimeters. Bare soil hit by irrigation droplets or pounding rain breaks down at the surface: fine particles move, settle, and dry into a denser layer that behaves almost like a lid. Penn State Extension notes that crusting reduces infiltration and blocks seedling emergence.
What it looks like
- A hard, smooth surface after rain
- Seedlings struggling to break through
- Water running off an otherwise workable bed
- A noticeable “shell” over softer soil underneath
What to do
Think protection, not punishment. A light organic mulch—shredded leaves, clean straw, fine bark, appropriately used compost—softens the impact of water droplets and shields the surface. The principle is simple: don’t leave living soil unnecessarily exposed to repeated impact.
4. You’re Outrunning Your Soil
Two problems look different but resolve to the same fix, so I’ve put them together.
The first is heavy clay taking water slowly. Gardeners see this and assume the soil is broken. But clay isn’t broken—its particles are extremely small, giving it many fine pores that simply move water differently than sand does. Texture is a fundamental soil property, and it’s not something you casually “fix.”
The second is applying water faster than the soil can accept it. Picture pouring a gallon through a funnel all at once: the funnel works fine, but if the flow exceeds its capacity, water spills over the sides. A high-output sprinkler, nozzle, or drip emitter can outrun a given patch of soil the same way.
In both cases the answer is the same—cycle and soak:
- Water for a shorter period.
- Stop.
- Give it time to infiltrate.
- Water again.
Signs you’re outrunning the soil
- Runoff starts a few minutes after irrigation begins
- The high end of a sloped bed stays dry while the low edge pools
- Erosion channels appear, or mulch starts floating away
- One part of the bed turns muddy while another stays dry
What to do
Break irrigation into cycles, and match the application rate to what the soil can take. That may mean lower-flow or better-spaced emitters, shorter cycles with pauses, basins around individual plants, or contouring on slopes. A longer watering time is not automatically a deeper watering if half of it runs away.
5. Water Is Bypassing the Root Zone
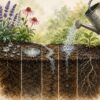
This one fools people. You water, the water disappears, and you assume success. Not necessarily. Water can race through large cracks, old root and worm channels, gaps along raised-bed edges, or the space between a dry root ball and a container wall—leaving much of the surrounding soil dry while irrigation seems to vanish instantly.
Container gardeners see the potted version constantly: the mix dries, shrinks away from the wall, and water you pour on top runs straight down the gap and out the drainage hole. You see water pouring from the bottom and think the pot is soaked—while the center of the root ball is still bone dry. The fix is the gradual rewetting from Section 1, not more frequent flooding.
The easiest way to check
After watering, wait a bit and dig. Not just at the surface—use a trowel and inspect several inches down in two or three spots. You may find wet channels surrounded by dry soil, a wet surface over a dry root zone, moisture only under one emitter, or a dry root ball sitting inside apparently wet soil.
This is why I’m such a believer in putting a hand in the soil. The surface can lie.
The 60-Second Soil Absorption Test
You don’t need lab equipment to learn a lot in a minute.
- Choose three spots—the problem area, a healthy area nearby, and a representative spot elsewhere.
- Apply the same amount of water to each (a measuring cup or small can). You’re comparing behavior, not calculating a rate.
- Watch closely. Does it bead? Spread? Pool? Run sideways? Disappear down a crack? Does one area behave differently from the others?
- Wait, and give the water time to move.
- Dig. Scratch down several inches and look at the actual wetting pattern.
You’ll learn more in one minute with a trowel than in an hour of guessing.
What Not to Do When Water Won’t Soak In
A strange watering problem tends to trigger random amendment syndrome. Resist it.
Don’t automatically add sand to clay. This is one of gardening’s most persistent bad tips. Oregon State University Extension warns that adding sand to clay can create worse conditions, and specifically rejects the idea that a few bags of sand will turn clay loam into sandy loam.
Don’t automatically add more compost forever. Organic matter is useful, but “add compost” isn’t a universal cure. Some gardens already have excessive organic matter or nutrients—OSU recommends testing rather than assuming more is always better.
Don’t just keep watering longer. Ten gallons applied doesn’t mean ten gallons entered the root zone. Some may have run off, pooled, evaporated, bypassed roots, or drained past a shallow root system.
Don’t treat every slow-draining soil as hydrophobic. These are different problems. Hydrophobic soil resists wetting and tends to bead; slow-draining soil accepts water slowly and tends to puddle. Watch first. Diagnose second.
Master Gardener Tip: Keep a cheap, long screwdriver by the hose bib and make “probe, then dig” your reflex before you ever reach for an amendment. Ninety seconds of investigation—push the probe to find dense layers, then trowel down to see where the water actually went—will out-diagnose any bag of product at the garden center. Amendments are the last step in the process, not the first.
Water the Soil You Actually Have
Gardeners love universal schedules. Water for 20 minutes. Give plants an inch of water a week. Run drip twice a week.
But soil doesn’t read gardening memes. A sandy bed, a compacted clay slope, a compost-rich raised bed, and a dry peat mix can get the exact same irrigation and give completely different results.
That’s why observation beats any schedule. Watch where the water moves. Check beneath the surface. Look at the roots. Notice whether the soil beads, puddles, cracks, crusts, or channels. Because when water won’t soak into your garden, the answer isn’t always more water.
Sometimes the garden is telling you: slow down, look closer, something is happening beneath the surface.
And the best gardeners learn to listen.
Frequently Asked Questions
Why does water sit on top of my soil?
It may be compacted, fine-textured, crusted, already saturated, or underlain by a restrictive layer. If the water forms distinct beads rather than a puddle, water repellency may be involved too.
Why does dry soil repel water?
Some very dry growing media—especially peat-heavy or soilless container mixes—become genuinely hard to rewet. Gradual rewetting works far better than pouring on a large volume all at once.
How do I know if my soil is hydrophobic?
The classic clue is water forming beads or sitting in droplets instead of spreading and soaking evenly. Compare several areas, then dig below the surface to check the actual wetting pattern.
Will adding compost help soil absorb water?
It can, depending on the soil and the underlying problem—but it’s not a universal prescription, and repeatedly adding compost without testing can push nutrient or organic-matter levels too high.
Should I add sand to clay soil for better drainage?
Usually not as a home-garden fix. Small or moderate additions of sand don’t convert clay into loam and can create difficult conditions.
Is dish soap safe to use as a soil wetting agent?
I wouldn’t use household dish soap or shampoo as a substitute for a horticultural product designed and labeled for the job. Extension sources caution against this popular remedy.
Why does water run straight through my plant pot?
The mix has likely dried and shrunk away from the wall, letting water bypass the root ball. Apply water gradually, pause between applications, and check whether the center of the root mass is actually getting moist.
Copyright © 2026 The Celtic Farm. All rights reserved.

More From Our Master Gardener




Special Gifts for Gardeners
Shop Our Gardening Gift Boxes

5 Star Reviews for Our Hori Hori